
10.03.v4-Introduction to OrthoTraining

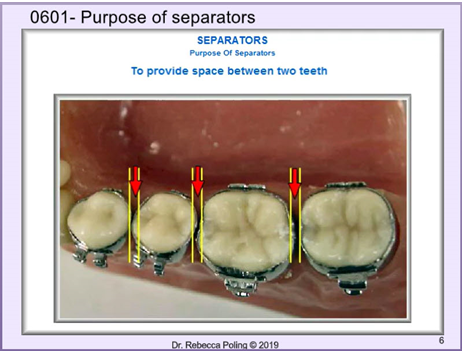
60.11-Separators
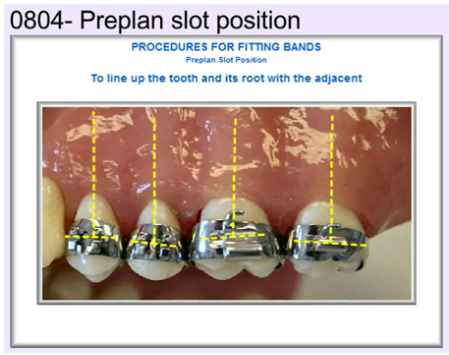
60.12-Banding
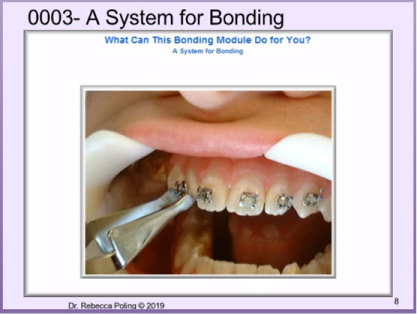
60.20-Orthodontic Bonding
60.41-Ortho wire Basics

60.42-Initial wire Insertion

60.51-Retie Appointment

60.61-Debanding Appointment

Click here to Download a
Detailed Description of 60.00-Orthodontic Assistant 60-Day In-Office Training ProgramIntended Audience and Prerequisites for 60.00-Orthodontic Assistant 60-Day In-Office Training Program
The intended audience for the 60.00-Orthodontic Assistant 60-Day In-Office Training Program are students who seek training to become state-licensed chairside orthodontic assistants who place braces on a patient’s teeth, adjust the braces, assess orthodontic treatment progress and remove the braces.
The introductory course, 10.03-Introduction to OrthoTraining, is included in the Training Program curriculum so it does not need to be taken separately.
Minimum prerequisites for students who take this course are graduation from high school and at least 6 or more months of employment in an orthodontic practice. Students should be proficient in English.
Since this is a college-level course, suggested prerequisites are college-level courses in basic writing, basic math, introductory courses in biology, chemistry, anatomy and physiology, microbiology, and psychology. Knowledge from these courses give students a solid foundation for future learning and advancement as an Orthodontic Assistant.
OrthoTraining System for administering the 60.00-Orthodontic Assistant 60-Day In-Office Training Program
The unique OrthoTraining System that delivers The 60.00-Orthodontic Assistant 60-Day In-Office Training Program is equivalent to a college-level course with detailed presentations, Knowledge Quizzes to measure learning, and step-by-step checklists for hands-on training. The System is fully integrated to teach knowledge concepts, measure knowledge learning, deliver hands-on training, measure quality control of hands-on learning, and summarize results of all learning activities on a Student Dashboard Grade Report linking to course completion certificates.
The eight online courses teaching course objectives in their Presentations have a total run time of 14 hours. Students must have razor-sharp focus to learn this information and are assisted by answering hundreds of embedded quiz questions that give correct answers to the learner. After learning each presentation, the student is advised to sleep so that learning can be processed out of short-term memory into long-term memory into the Executive Function area of the Frontal Lobes of the brain. After sleeping, each student takes the course Knowledge Quiz (without answers) that measures long-term learning in the brain and the accuracy of student recall. The student has only two attempts to pass a Knowledge Quiz at the 80% level. The objective of the Knowledge quiz is to give valuable learning feedback to the student so the student can return to the presentation if a concept is not clearly understood.
All online course presentations teach performance of procedures using multimedia movies and include printable detailed step-by-step checklists that are used during hands-on training. Usually, a trained Mentor supervises a group of students who are all taking the 60.00-Orthodontic Assistant 60-Day In-Office Training Program at the same time within the office. This approach to training crosstrains all orthodontic assistants at the highest level of proficiency for optimum teamwork and production. OrthoTraining has tools that help train the Mentor to supervise the learning of the students.
60.00-Orthodontic Assistant 60-Day In-Office Training Program
This program teaches every detail about how to:
- Learn quickly and easily using the OrthoTraining System
- Bond brackets on the teeth so they are in the correct position, do not come off, and do not damage the teeth
- Use separators correctly to provide space between the teeth for fitting bands to the teeth
- Fit and cement orthodontic bands on the teeth so that they are properly positioned, do not come loose, and do not cause damage to the teeth
- Select orthodontic wires that are appropriate for the patient’s phase of treatment according to the orthodontist’s Treatment Plan for the patient
- Insert the first orthodontic wires of a newly-bonded patient so that the wires are activated, comfortable to the patient, and effective in achieving the desired results of treatment
- Assess patient progress at routine orthodontic adjustment appointments, report findings when the patient is being examined by the orthodontist, and perform designated procedures carefully, efficiently, and at the highest level to enhance each patient’s progress
- Carefully remove braces at the completion of treatment restoring the teeth to polished enamel surfaces
The Educational Goal and Objectives for 60.00-Orthodontic Assistant 60-Day In-Office Training Program
For more information including the educational goals and objectives of each course, review this detailed description of all 8 courses in the 60.00-Orthodontic Assistant 60-Day In-Office Training Program Description.
Course Materials Included in the 60.00-Orthodontic Assistant 60-Day In-Office Training Program:
After creation of a free OrthoTraining Student Account, selection of the 60.00-Orthodontic Assistant 60-Day In-Office Training Program, and payment of the
US$720 fee for just 30 days of access
OR
US$1152 for 60 days of access, the user will receive:
- Full use of the unique OrthoTraining System for Learning Management
- Access to the 60.00-Orthodontic Assistant 60-Day In-Office Training Program with
- 16 Interactive online Presentations (14 hours of run time) available for unlimited viewing during the access period
- 15 Interactive online Knowledge Quizzes to measure learning and give student feedback on learning progress
- SCORM Tracking that collects data on student viewing time, presentation completion scores, and Knowledge Quiz scores for “grade” reporting and documentation
- Student Dashboard Report listing progress in completion of all course requirements that is used to generate a “grade” for the Program that can be linked to an official OrthoTraining Transcript
- A printable copy of each Course Completion Certificate and OrthoTraining Approved Provider award of each course’s CE Credits
- Printable 60.00-Orthodontic Assistant 60-Day In-Office Training Program Completion Diploma
- Downloadable digital copies for creating an OrthoTraining Orthodontic Assistant Student Notebook that will contain documents used in hands-on training sessions:
- Notebook Cover Page instructions and inside first page
- Recommended Schedule for administering the 60.00-Orthodontic Assistant 60-Day In-Office Training Program with hands-on training sessions each week for 8 weeks
- 22 Printable course checklists that are used in the hands-on training and must be signed by the Mentor
- Printable detailed description of 60.00-Orthodontic Assistant 60-Day In-Office Training Program
- Printable Script for each course under “Presentation Resources” with the narration of each presentation slide
- Other course documents under “Presentation Resources” that can be printed and included in the Notebook
- Suggested Materials List for some hands-on training sessions
- Online Feedback Form to evaluate the quality of the program sent to OrthoTraining
Orthodontic Assistant Mentor Training
Students who complete the 60.00-Orthodontic Assistant 60-Day In-Office Training Program earning the Diploma, and are licensed in their state, are eligible to become an OrthoTraining OAP Mentor. They receive an OrthoTraining OAP Mentor Account where they can enroll students in OrthoTraining Chairside Orthodontic Assistant courses and administer the program to those students. Trained Mentors set their own fees for administering the 60.00-Orthodontic Assistant 60-Day In-Office Training Program. The Program fee for new OrthoTraining Student Account subscriptions remains the same.
Other Information about the 60.00-Orthodontic Assistant 60-Day In-Office Training Program
Course Subscription Fee: The 60.00-Orthodontic Assistant 60-Day In-Office Training Program subscription fee is US$1152 for 60 days of access to the Program and access to all Course Resources for a single user.
The Program Instructor is Dr. Rebecca Poling, an ABO-certified orthodontist, former professor at a major US university, international lecturer, and the Founder of OrthoTraining. She has been teaching dentistry and orthodontics for over 40 years. She has no conflicts of interest.